iStock-1265628128-1280x854.jpg

November 2, 2022by Chase Bodor

The mold build designed to shorten time-to-market and reduce tooling costs.

Have you ever approached an injection molder looking to source a quote for a project still in the development phase? If so, you might have balked at the initial tooling price. Why on Earth would you invest so much upfront on a project you’re not sure will succeed on the market?

Well, there’s another tooling option that you might not be aware of – MUD units. In a nutshell, a MUD unit is capable of making quality, precision parts without the price tag. This is the perfect tool build to produce a short run for your engineering or market tests.

In this article, we’ll go into more detail about what a MUD unit is and how it works. You’ll also find the benefits of this type of build and its capabilities. Finally, we’ll send you home with some notes to take back to your engineering team. If you have further questions, please reach out!


What is a MUD Mold Base?

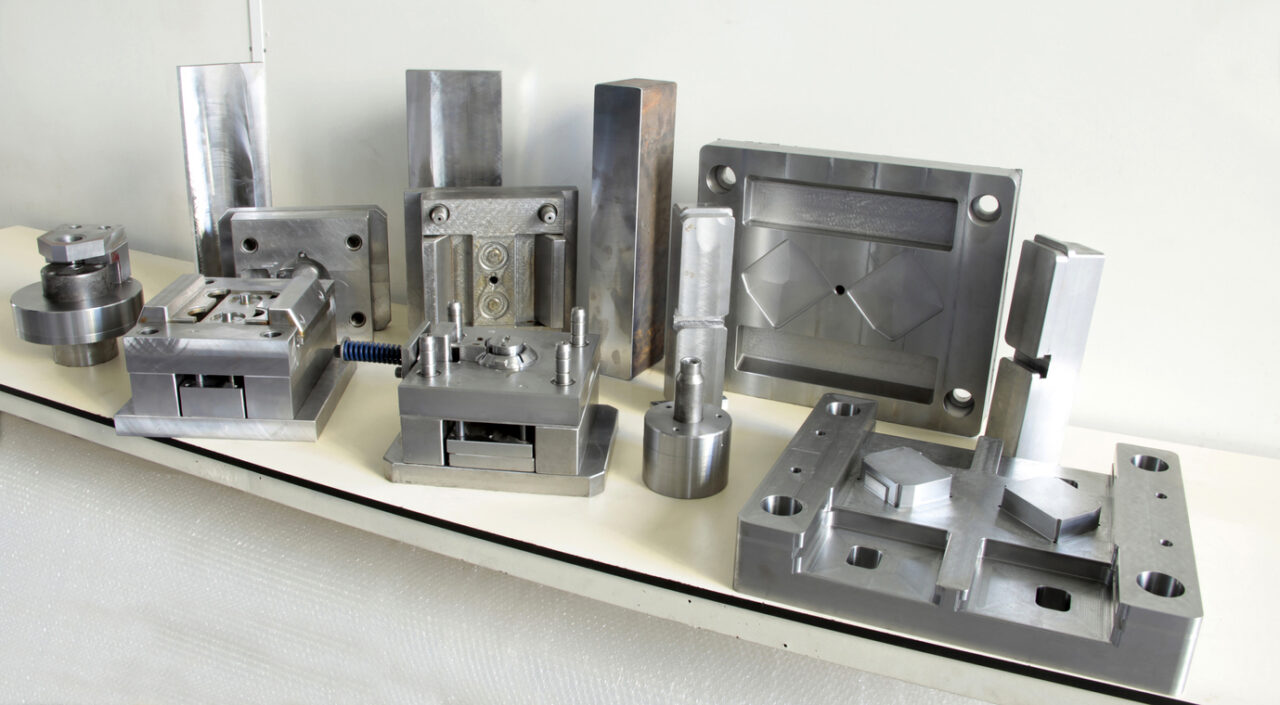
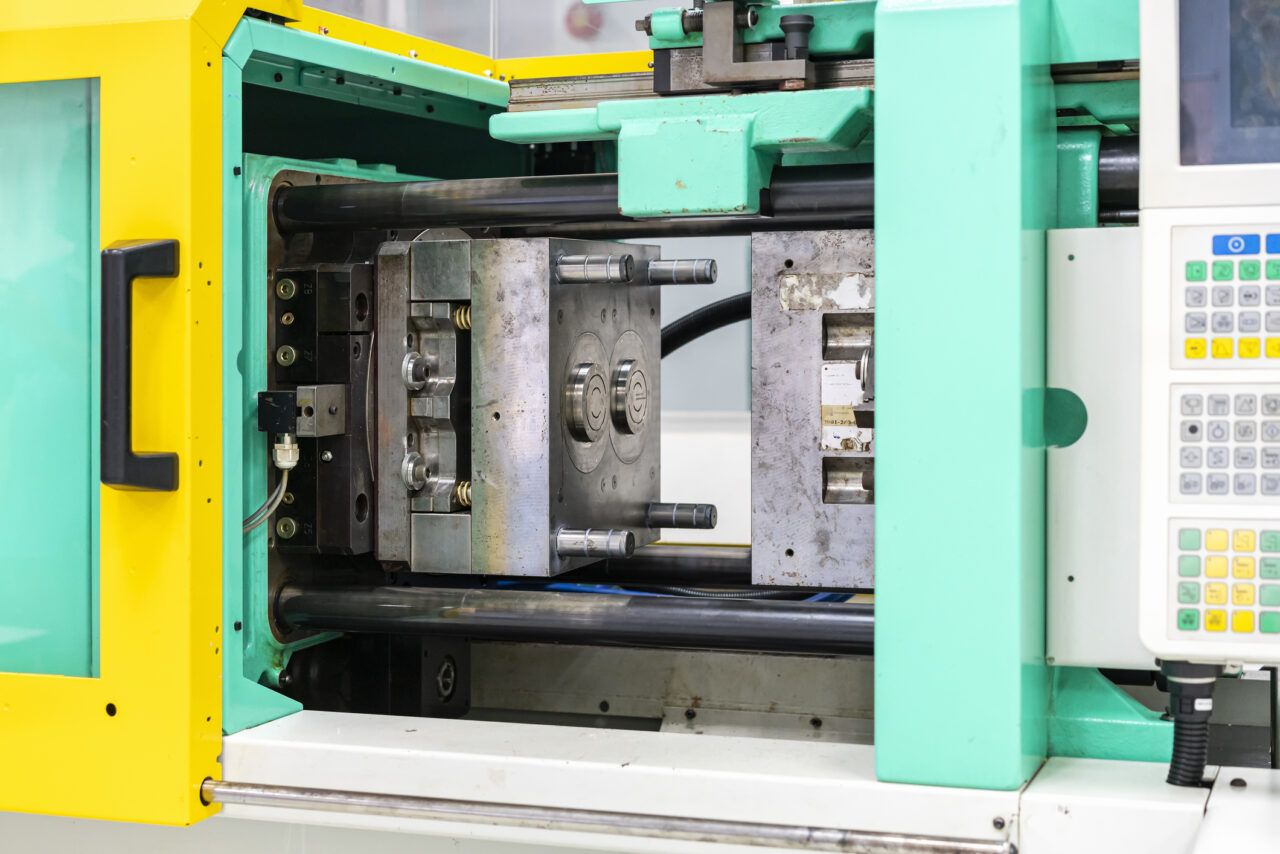
A MUD – or Master Unit Die – is a modular mold base that houses interchangeable cavity and core inserts. These builds use a standard-size mold frame that can be left in an injection molding machine while a mold technician completes a changeover. In other words, the molder can change molds by simply removing the core and cavity inserts and replacing them with another compatible set. This is ideal when you have multiple product configurations or a product still in development.


What Does a MUD Base Do?

MUD bases are a cost-effective, yet productive alternative to full-sized molds (full chase). The modular nature of a MUD unit allows molders to quickly switch mold configurations or even to other products with minimal downtime. Once the mold frame is in place, the molder can quickly change out the core and cavity inserts in favor of a different set. In just a few steps, the manufacturer can go from molding one product to another.

Choosing a mold base will still allow you to build *thousands of parts with quality and precision. In fact, the ability of these tools is on par with small and medium-run injection molding tools. Furthermore, many mold builders can build these while incorporating hot runners and other mold accessories to drive better manufacturing results.


MUD Bases and Project Development

It is true – MUD bases are perfect for projects that are still in development or going through design changes.

Having removable inserts makes troubleshooting and making tooling adjustments much easier. This is mainly due to the technician not having to remove an entire mold base. In addition, the mold builder can work quicker by not having to disassemble multiple mold plates.

These inserts are typically made of P20 or H13 steel. The former is softer and therefore easier to machine. This makes modifying the tool to address a design change much more feasible. However, drastic changes to a design may require building new inserts completely.

Ultimately, this is better than having to build an entirely new mold.


Benefits of MUD Bases

We’ve covered a few of the benefits of MUD bases already. Here is a summary of those benefits:

·        Setup time reduced from hours to minutes

·        Quick/ easy to modify without removing an entire mold frame

·        Minimal production downtime

·        Easy to handle, use, install, and maintain

·        Lower tooling build cost as you only need to purchase in A& B inserts and not the entire mold base.

·        Lower molding processing costs from quick mold change reducing downtime

·        Lower labor costs by reducing the number of techs working on one mold.

·        Speed to market is improved by reducing machining time and workload.

·        Sustainability – the frame can be reused with other inserts.

·        Supply chain flexibility to support just-in-time scheduling


Types of MUD Bases and Frames

As we discussed, the core and cavity inserts have a ton of customization options. Mold frames on the other hand do not.

Mold frames are more standardized in size and build. For the inserts to have a proper fit and truly be modular– you need the proper frame shape. Fortunately, there are a handful of shapes available that allow you to be more flexible with your insert configurations.

Here are a few of the main ones:

U-frame: standard single insert

H-frame: standard double insert

Double H-frame: Standard 4 insert

E-Frame: side by side double insert


What You Do and Don’t Need to Know (Conclusion)

It is unlikely that you will have to decide for yourself which mold frame to go with. Your injection molder will have the insight to use the best frame for your MUD unit.

On the other hand, it is up to you to understand the capabilities and limitations of the MUD unit. While it is possible to have a MUD unit produce hundreds of thousands of parts – that is beyond its life expectancy. Furthermore, you should expect to see wear on the tool where there are moving parts (slides, cores, pins, etc.). This can cause issues with production and impact the final part quality or result in unplanned downtime.

Therefore, you should have a conversation with your molding partner to see if building a high-volume production tool is right for your project. At that point, you can plan an appropriate timeline for ramping up production and minimizing potential downtime.

Launching a new product soon?

If you’re planning to launch a project in the next year and need a MUD unit for market testing – we can get one built for you! Visit our website and fill out an RFQ form to start the process. We look forward to working with you!


August 10, 2022by Chase Bodor

Typical Steel Properties For Injection Molding Tools

Properties Carbon steel  Alloy steel Stainless steels Tool steels
Density (kg/m3) 7850 7850 7750 – 8100 7720 – 8000
Elastic Modulus (GPa) 190-210 190 -210 190 – 210 190 – 210
Melting Point (oC) 1425 – 1540 1415 – 1432 1371-1510 1400 -1425
Tensile Strength (MPa) 276 – 1882 756 – 1882 515 – 827 640 – 2000
Hardness (Brinell 3000kg) 86 – 388 149 – 627 137 – 595 210 – 620
Yield Strength (MPa) 186 – 758 366 – 1793 207 – 552 380 – 440
Thermal Expansion (10^-6/ K) 11 – 16.6 9.0 – 15 9.0 20.7 9.4 – 15.1
Thermal Conductivity (W/m.K) 24.3 – 65.2 26 – 48.6 11.2 – 36.7 19.9 – 48.3

This chart for typical steel properties for injection mold tools is to be used for reference only and is public information. Plastics Plus Technology Inc and its partners are not responsible for decisions made based on this information alone.

Click here to view it in PDF format.


SafakOguz-1280x705.jpg

May 7, 2021by Chase Bodor

Injection molding is a common process for making plastic products in large volumes. Most people that are familiar with the subject know its capabilities.

Those same people also know another aspect of injection molding: the cost of building a mold.

The capital investment with building a new tool is a challenge for buyers and engineers. This investment checks out in the tens of thousands or even hundreds of thousands of dollars. A sum like this causes friction for launching new products to market, where the product has yet to be tested. Additionally, a project that is still testing the market won’t have a clear ROI forecast.  Because of this, many teams are hesitant to invest in a tool without proof in the pudding.

Luckily, injection molders provide options for teams in different stages of their project. One of these options is to select a class of tools that matches your needs. For example, there are three types of tooling: prototype, bridge, and production. Each type of tooling has its benefits and disadvantages. But, each type will offer results at a reasonable price. Let’s jump into these tooling options further.


Prototype Tooling


Defining ‘prototype tool’

A prototype tool, also known as a Class 5 tool, is a low-volume run tool made for products that are in the development and testing stage. This class of tooling is great for testing a design’s functionality while staying flexible with design changes. Because of this, prototype tooling is a great starting place for rolling out new to market products.


Prototype tooling costs

The upfront investment in tooling is the biggest barrier to injection molding. Production-ready tooling is often too much for projects that are new and unproven.  In comparison, prototype tooling is by far the lowest-cost option.  Because of this, many companies choose to build a prototype tool first and then test their design. By doing this, companies will identify issues early and correct them on production-level tools. This will help cut costs at the earliest value stages of the project.


Types of Steel Used in Prototype Tooling

One of the key differences between tooling types is the kind of steel used in the mold build. When building the mold, a toolmaker can choose from a few different steel types. Each of those options will affect how long the tool lasts, how well it performs, how expensive it is, and what features the tool can use. Additionally, every type of steel has its own core properties. For a prototype tool, the mold base is made of low to mild-grade steel or aluminum.


Key Features of a Prototype Tool

Prototype tooling is a no-frill, but cost-effective way to get parts made and onto the market. Because of their simple configurations, a prototype tool uses cut-in-steel cores and cavities. This means that the toolmaker will cut the cavity/ core into the mold block itself instead of making interchangeable cavities. Additionally, class 5 tools will often opt out of expensive features: like complex cooling channels, runner systems, slides, and other features found on production tooling.


Takeaways from Prototype Tooling

+ Cost-effective

+ Great performance for the price

+ Standard textures and polishes

+ Great for testing features/ fit for applications

+ Flexible designs

+ Great for testing market demand and project ROI

– Low volume 

– A short lifespan (>500shots)

– Minimal features

– Soft steel (easy to damage)

– Not weldable


Bridge Tooling

Bridge tooling is the intermediate step between prototype and production tooling. As the name suggests, this type of tool is a stopgap for products that have succeeded in their early stages. As a result, these products are ready for higher volume production. And with high volumes comes the need to upgrade your tooling. 

However, bridge tooling is limited when compared to production tooling. For example, a bridge tool is not equipped with advanced features- like complex cooling channels. But, by choosing not to have these features you can cut significant costs. For this reason, bridge tooling is great for dialing in the process, calculating ROI on the project, and testing the market. 

When should you use bridge tooling? And when is it appropriate to use full-production tooling? The answer to this depends on several factors. For instance, we look at the product’s application, the expected volumes, the material used, and more. 

Mold Base and Tool Life

The steel used in a bridge tool is dependent on how many lifetime shots you expect to get out of the tool. For a Class 4 tool, the base can be made out of mild steel material. This will get you up to 100,000 shots/cycles. For a Class 3 tool, you will have to spend more to get hardened steel (minimum of 165 BNH). However, with this tool, you can expect to get 5 times the amount of shots (500,000).

Material Hardness (Resin Choice):

Material choice is an important factor in deciding what grade steel to use. For a bridge tool, a harder resin will wear the tool down faster. This will affect the life expectancy of the tool. Additionally, if the tool closes on a rigid plastic part, it could damage the mold. These damages aren’t dramatic, but the cost of maintenance and potential downtime increases.

Application- How it’s used:

The product’s environment and function influence the volume and material. First, if the parts are high in demand and replaced often, then you can expect high volume production. Second, if the parts are often exposed to harsh environments- chemicals, heat, etc… then you will need rigid material. With the combination of rigid material and high volume, it is best to consider hardened steel.


Production Tooling

Think you’re ready for production tooling? Great! There are many reasons to build a production-ready tool. One of the main reasons: dependability. A hardened steel tool is reliable and can make hundreds of thousands of parts. Thus, these tools make great ‘flagship products’- your main product offering. 

Mold Base and Tool Life

Class 1 and Class 2 tooling are your best options for high-volume production runs. All Class 2 molding services (cavities and cores) are made of 280 BHN hardened stainless steel. Additionally, this steel is heat-treated to a minimum of 48 Rockwell “C”. This hardness allows the tool to last up to 1 MILLION cycles.

A Class 1 tool will get you into the multi-million cycle mark for extreme volume projects. This type of tool also has a minimum hardness of 280 BHN but is heat-treated to 48 Rockwell “C”.

Summary of choosing the right tool for your needs.

Ultimately, a high-end car is better than a low-end car, but there are reasons to hold off on the big price tag. The same applies to an injection molding tool. A production-capable tool may have all the bells and whistles. Yet, the cost of hardened steel and complex fixtures may surpass the needs of your project. 

Ultimately, the type of tool you need depends on where you’re at in your project’s lifecycle. If you’re launching into a brand new project or one you haven’t tested the market for, build a bridge tool. 

If the design you have may go through many revisions before it goes on the market, build a prototype tool.

If you have the next best product on the market, and you’re selling quantities of 500k or more, splurge on a production tool.


  • Menu
  • About Us
  • Social Media
  • Contact Us
Menu

Under construction. Check back later

About Us

Plastics Plus Technology is a woman-owned, USA contract manufacturer based in sunny Southern California. Our custom injection molding and value-added services can provide you with a one-stop job shop for all your plastic manufacturing needs.

ISO 9001:2015, ISO 13485:2016 QMS certified and compliant. FDA compliant. Good Manufacturing Practices (GMPs). WBENC.

Social Media
Contact Us
Phone EmailContact Form